Showing posts with label DIY projects. Show all posts

Wednesday, March 9, 2011

geometric paintings

My apartment is nice, but sometimes it feels a bit blank on the walls.

So for the past few weeks, I've been working on some painting projects on the weekends. They had this awesome 70% off sale at the art shop around the corner, giving me the impetus I needed to try some ideas on a few canvases.

One of my projects: I painted some pictures to go in the bedroom. Before, there was empty space above the TV that felt utterly renter-ly:


Here are the new pictures that I painted. I decided on something that would brighten up the wall in contrast to the neutral paint. The paintings give this part of the room a more lively look, and it adds a punch of pear-green color without being overwhelming. 


I was inspired to do geometric designs by an amazing book, Knitting Nature, which has clothing patterns all based on geometric patterns found in nature. I love the designs and photography (so lush and simple!) and will make something from this book one day. For instant gratification in the meantime though, painting will do.


Friday, January 21, 2011

After: My new office/guest room!

As promised, here are the "after" pictures of my redecorated office/guest-room!

The new bookcase and organized desk, with the re-upholstered chair and fabric corkboard


The desk now can be used for both writing and craft projects. Instead of keeping my sewing machine out all the time, I discovered that it actually fit perfectly under my desk (yeah, that was a revelation), and I organized my supplies in little black boxes. It's much easier to find and reach things now. And why yes, there is a box devoted entirely to scissors.

One of the new items I bought was a teal and silver lamp from Home Goods, and it ended up being one of my favorite things in the room.


And here's the guest bed with the new pillows (I described how I made the pillows in an earlier post) and new framed fabric art.

Here are pictures of the room before I redecorated

I'm happy with what I've done so far. I've of course got a few more projects on my mind, at the same time. I'm thinking about making a teal or gray tufted headboard for the guest bed. What do you all think?

I'm also thinking about doing some kind of nice white with teal trim duvet cover (possibly by re-purposing one that I already own), and hanging up some more artwork to try to get away from that white-walls rental look.

I'd love to hear any other ideas or suggestions. What do you think makes an office a peaceful place to work?

Sunday, January 16, 2011

Pillows project

Today's project is on making new pillowcases for my office/guest room. How about I just call it the offuest room? No? 

If you've been following my redecorations, you'll know that my last three projects have turned me into the Sheriff of the Staple Gun. Pillowcases, however, as I will reassure anyone who will stay the night in my home, do not involve any staples.

Before: These are the pillowcases I'd made a few years ago for my old apartment:


After: These are the new pillowcases in black, white, and gray fabric.

Another thing I did, which actually isn't pictured, is to make the pillows on the end two-sided. That is, I used the ring dot fabric on one side, and the reeds fabric on the other. That way, I can flip the pillows so I have two of one pattern, or one of each pattern, facing out for some variety.

Materials:
-Fabric to fit pillows, plus a few extra inches to line up the pattern and for seam allowances
-Sewing machine, needle, thread, etc.

This is one of the most basic sewing projects I can think of (Can you draw a square? Yes? You can make a pillow.).  I cut out the squares, lined them up right sides together, and sewed them up on three sides. Then I flipped them right side out, stuffed the pillow in, and stitched them shut. Someday I may put in zippers, but I didn't find it necessary at the moment.

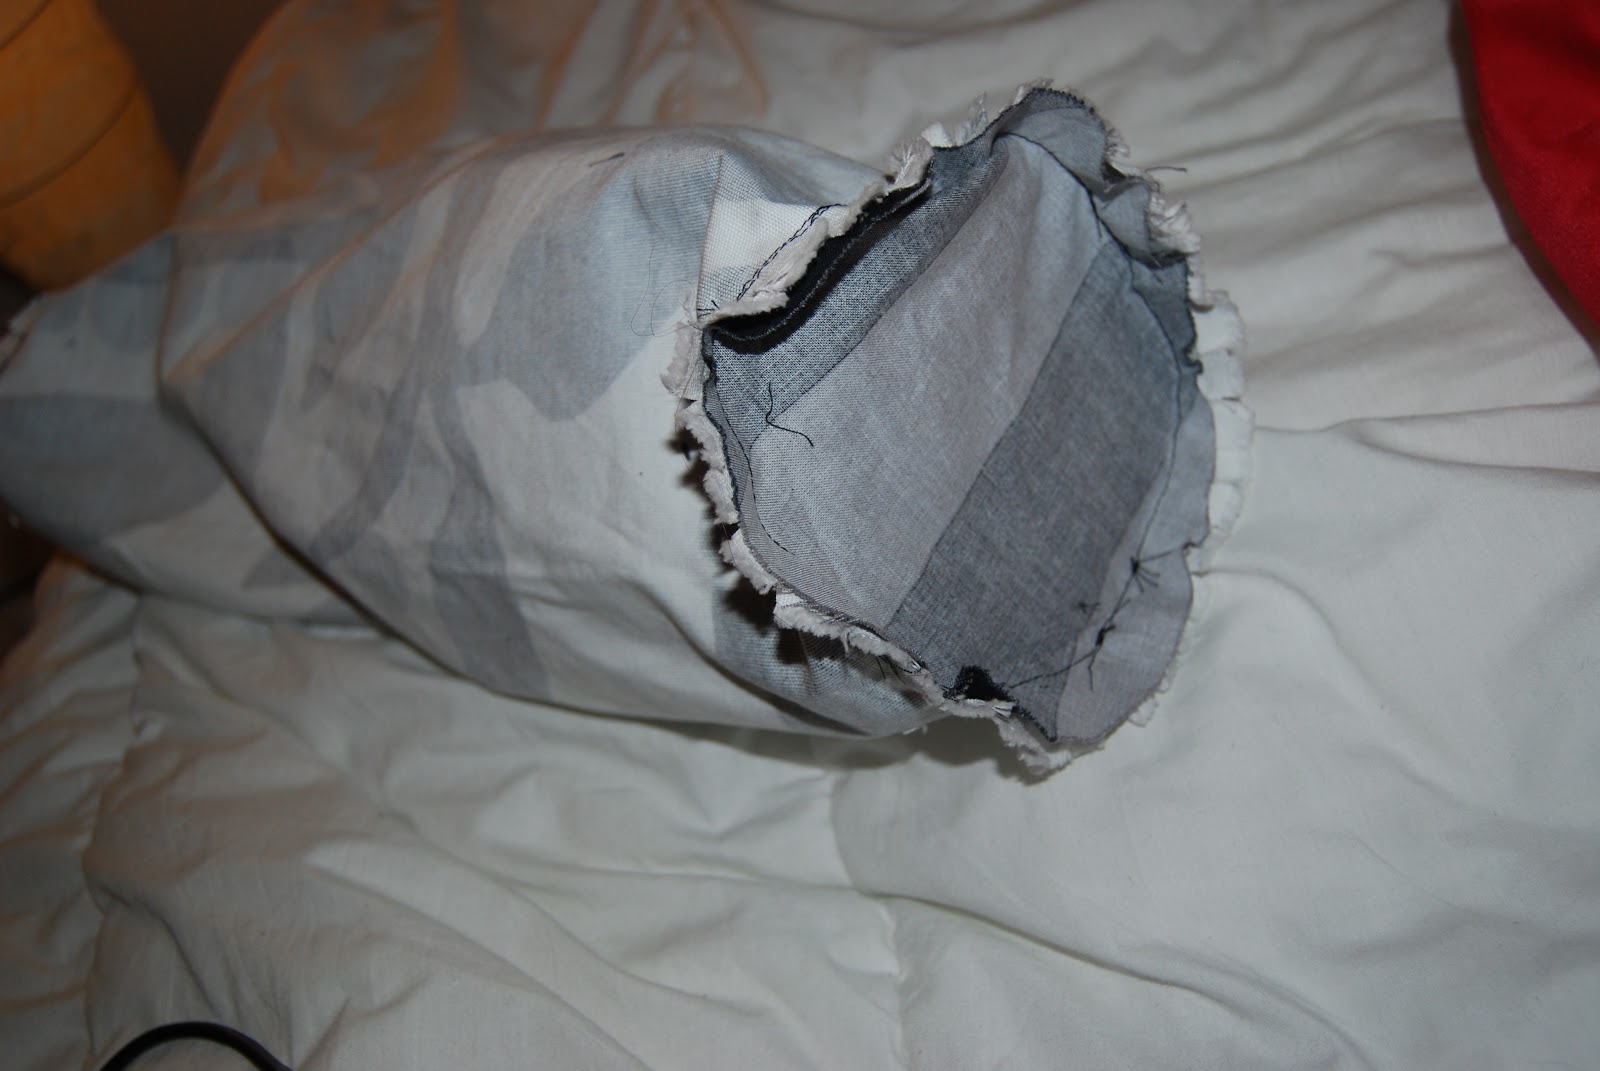
I was left with one red squishy "moshi" pillow. I think it may have resembled something round back in college, but in the present day, it was literally an amorphous blob. This too, I measured, and I made a cylindrical roll pillow to fit. Here are some pictures during the "in progress" phase:


Making this pillow was the opposite of the square pillows; while the square ones I could have made in my sleep, the roll pillow fought against me with every inch of its shapeless being. It's a rectangle sewn into a cylinder (easy) with circles on the ends (surprisingly tricky). I must have resewn and repositioned the circles on the ends at least 3-4 times. I was just glad I kept it simple and didn't use any fancy trim or different fabrics this time. Then I flipped it inside out and poured in the filling, which is made of impossibly tiny white balls, from the other pillow. I'm expecting I will still find tiny styrofoam balls stuck to my belongings 5 years from now.

Saturday, January 15, 2011

Desk chair project

The next small project I did while redecorating my office/guest room was to reupholster a chair.

In the "before" phase of this project, I had a standard desk chair on wheels, but it didn't fit neatly under my desk. As the goal was to make things organized and sleek, it had to go, so I sold it on craigslist.

I needed a chair without arms, and while I did look around on craigslist for a nice parsons chair or something of that nature, I discovered that the best option was right under my nose. Right under my dining table, in fact.

My desk chair came into my life a couple of years ago as free chairs that someone else was throwing out. I painted and reupholstered them with fabric to match my living/dining room, which I discussed a couple years ago in this post.

Here's what they looked like as my dinette chairs:


They looked OK, but I admit they were on the old-fashioned side. You can't see the fabric too well, but it was this velvet with a cut-out swirl which I really liked, but the color was boring. I had plans to get rid of the chairs, but I realized that I could keep one for my office. Total cost: $0 instead of $$ to buy a new chair.

After:


Doesn't it look much better with the black and white fabric? I wasn't sure if I would like it, but the black fabric definitely makes the ironwork "pop." Just having one chair with the fancy pattern is much less overwhelming than three of them.

Materials:
-Fabric
-Staples and staple gun
-Screws and screwdriver

It was simple: I removed the seat from the chair, lined up the fabric, and stapled it on. The trickiest part is to pleat the fabric around the rounded edges so it sits smoothly on the corners. Then I screwed the newly covered seat back into the chair.


Because of all the time I have been spending with my staple gun lately, I thought I should come up with some kind of title for myself. The first thing that came to mind was "Queen of the Staple Gun" but that sounded too staid, and "Princess Staple Gun" too precious. Then I thought perhaps "President of the Staple Gun," but no one elected me to that position and the staples were not adequately represented in this matter. So I have come up with "Sheriff of the Staple Gun," a title to connote the rugged nature of stapling, as I brandish my (staple) gun to round up those lawless fugitive staples.

Friday, January 14, 2011

Framed fabric project

Here's another simple project I did as part of re-decorating my office/guest room. These are pieces of fabric stretched over wood frames. You might recognize them from before when I had some different fabric hung up. I changed the fabric to fit my new color scheme.
 

Materials:
-Fabric hanging kit from IKEA for about $5 each
-Fabric
-Staples and staple gun

 The hardest part of this project? Picking out the fabric. I looked at so many different types of fabrics before I found some that were the appropriate scale for a wall hanging. It's easy to find great fabric--not so easy to find great fabric that is a large-scale print. The prints I saw were either too small to make good wall art or very expensive upholstery fabrics. I finally found some upholstery fabric that was about $11 a yard from an online store called Contemporary Cloth.

Once I had the fabric, all I had to do was rip off the old fabric, line up the new fabric, and staple it on. The IKEA kit came with nails (a thoughtful idea for those who don't have a staple gun), but it is much easier to staple. 

Later on, I'll post some pictures of how they looked in the room overall.

Thursday, January 13, 2011

Corkboard project

Let's start with some of the simple projects. I recovered a plain corkboard to fit my black and white color scheme for the office/guest-room:


Before: Your standard-issue corkboard:

 After: Fancy new fabric corkboard:

Materials:
-Fabric to fit the board
-Staples
-Staple gun
-Picture hanging kit (or adhesive foam tape)

It takes a few minutes to make sure it's lined up on all sides. After that, it's just some  stapling. To hang it up later, I used a picture hanging kit, although I could have also used some adhesives. The great part is, I can always take the fabric off if I get tired of the look later, or replace it with a different fabric later down the road.

Wednesday, January 12, 2011

Before: Office/guest room

I've recently been working on revamping my office/guest room area. It was the least decorated area of my apartment and definitely needed some sprucing up.

The challenge: I use the room for not just writing and blogging, but also working on sewing and knitting projects. We also keep our office supplies and keyboard up here. And of course, since it's a guest room, we have a futon up here too. It's a lot of stuff for one tiny space! 

Before: Graveyard of random furniture and craft supplies. I wasn't using the room much because it wasn't as comfy or organized as our living room.  

After: Fortress Loft of solitude. After putting some thought and work into redecorating and organizing, I now find it calming, and I actually enjoy spending a lot of time up there. It's been a great place to work on school applications and other projects.


It's a work in progress, so I'll share some mini-projects in my next few posts and then finally the "after" photos. Without further ado, here are some "before" shots:

Before: Every inch of wall was taken up with furniture: 


Before: The desk got a little crazy:

Before/in progress: Even before I got to work on the various small projects that went into organizing and redecorating, I had to reorganize the furniture. I moved the futon and decided to keep it primarily as a bed. The decorations are from my old apartment and weren't part of the new redecorating. Other items, such as the wooden desk, I eventually got rid of, and others, like the white cube shelves, I moved to another place in the apartment.


Before: This is while I was in the progress of taking everything out of storage boxes and off the desk so I could later organize it all:

Before: This is once I had sorted everything into different bags and boxes so I knew where it was for later:

Before I jump into the projects in my next few posts, I'll also share some restrictions on what I could/was willing to do. We rent our place, so we of course can only do so much.

1) No major construction (obviously) - so no replacing carpet for fancy hardwood, etc.
2) No shelving or anything screwed into the wall. Other than hanging pictures, our landlord prefers that we not mount anything in the wall.
3) Lastly, I decided not to paint any walls, because we may not be here that much longer. I don't want to spend money on anything that I can't take with me or can't enjoy for a long time.

With that being said, now I'll move on to some things I did want to do. As I'm into crafts projects and re-purposing things I already have, I definitely wanted to make the most of what I already owned. Instead of buying brand new accessories and art, I decided, when possible, to use fabric and paint to make my existing stuff fit into my new decorating scheme.

Since my futon and desk were black, I decided on a neutral black, gray, and white color scheme, with teal/blues as an accent color. Here are the fabrics I picked out:


Monday, May 17, 2010

Projects Update: Staining a Bookshelf

With the warm weather upon us, I have been given a new impetus to finish painting projects that languished over the winter. My biggest (i.e., messiest project) was to stain an unfinished pine bookshelf to a nice espresso finish, which would match the rest of my furniture. I don't have any before pics, but it was from Ikea, similar to the Ivar shelf they have now. I started the staining project during the fall, but then it was moved inside for the winter and put on hold. This week, I resolved to finish that pesky bookshelf.  Once I finished sealing it with gloss, I affixed a little accent light to the display shelf. 

Looks nice, doesn't it? 


Lessons learned:
1) I will never again underestimate the time it takes to stain a bookshelf. With multiple surfaces to each piece, and multiple coats on each surface, I just calculated that there were 180 separate coats on this project! Add an additional step of waiting 20 minutes to wipe off the excess, and 2-3 hours drying time in between coats to that, and I should have realized how long this would take. Doing pieces in groups only cuts down on the work so much. So the first lesson is to realize that more surfaces = much more work. 

2) The second lesson was that it is much better to paint the piece assembled than disassembled, even if that means it's less thorough. Early on in the project, since the shelf is adjustable, I wanted to paint the legs without having uncovered spots, which meant I disassembled the shelf to paint it. This made it harder and messier since it took up more space to paint. Later on, I realized it was going to be much more achievable to finish if I just put the shelf together. While it is no longer adjustable (without uncovered spots, anyway), at least it is finished, and a finished non-adjustable shelf is much more useful than an unfinished adjustable shelf. 

This being said, will it be crazy if I begin another wood staining project in the near future? 


Saturday, May 9, 2009

Step One: Cut a hole in the box


How to make a charger station for your equipment - from shoeboxes.

I have a fair amount of electronics. Some I stash away in a drawer until I need to use them, but others I use frequently. I don't like having cords everywhere that fall down behind the desk or get tangled up, so I figured out a way to make a charging station from cardboard boxes. This particular one took two boxes, but I could have of course added more (or less) if I needed to. 
 For this, I needed:
Two shoeboxes
Boxcutter
1 file folder/piece of cardboard
packing tape, paper, glue, and decorating materials (optional)

Step one: cut a hole in the box. (two actually, one for the power cord from behind the desk, and one for the USB cable to go out to the computer). Step two: Put your junk in that box (in this case...just my backup drive)
 
Step three: Cut a sheet of card stock/cardboard to cover the box. I used half of a file folder. This is so you can stack another box on top. 
 
Step four: cut more holes in the back of the 2nd box. One was from my printer, the other was from my cell phone charger.

 
Step five: Take the lid of the 2nd box and cut holes in the top. This is so your equipment (like cell phone or wireless mouse) can rest on top.


Step six: Nest the lid inside the second box and place the box on top of the first box. If you like, you can use tape to stabilize the shoeboxes (they're not always the most well-glued things), and cover the boxes in paper, stickers, or other kinds of decoration. 

And that's the way you do it!